Desem…Again!!
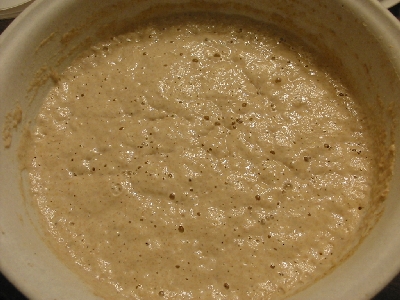
I really love the flavor of Desem sourdough bread. It is actually addicting! It is always sour, and when toasted, it tastes like malted wheat. I made up another batch of Desem, but this time I was more careful to use wheat berries that I had ground and let season (age) for two weeks. I had read that the mills did that because freshly ground wheat does not bake up as well as aged flour. Well, it seems to be true. I got a great development of gluten and the dough handled better. I am really getting a nice open crumb for a 100% Whole Wheat flour bread. Of course, as you know, the only other ingredients are water, salt (I have been using Kosher salt) and the wild Desem yeast. That makes for a nice loaf of bread devoid of chemicals or other ingredients that may have been processed. I have pure artesian water that has no chemicals in it, so I am really lucky there. Here is the preferment that is ready to use for making a Desem dough:

I mixed the dough for nine minutes as that is when it looked done:

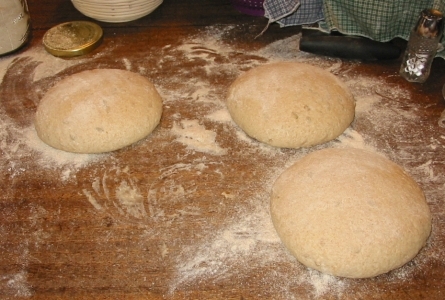
After bulk fermenting for four hours I shaped and benched (rested) the dough:

Then came final shaping and proofing:

This time I did not proof in a very warm, humid environment but just allowed the dough to proof at room temperature. It took around 2.5 hours. I then baked at 425 for 30 minutes. Here is the first loaf:

Here is the second loaf:

Here is the crumb, as you can see it is nice, open and nicely textured:

There is a lot more leeway for using and baking with Desem. If you have a Desem starter, I would encourage you to experiment.
Desem/Motherdough ~ Gee What Won't I Do?
Yep, just messin around. I like the flavor of Desem so much, and Motherdough is beyond great, that I thought I would combine them. I started out the night before baking, with a preferment, using Desem combined with water/flour/etc. I set it out overnight at room temperature and next morning it looked like this:
Desem Sourdough Day
I started a preferment the day before yesterday with my Desem starter, but had to go into town yesterday so I wasn’t able to mix it up and bake. Instead, I took out my preferment and did a build on it adding half again the amount of dough I had. Then I put it into the cold pantry overnight. In the morning it was very light and airy. So I put it in the mixer and doubled the weight of the preferment making about four lbs of dough. The dough was light and spongy after four hours, and had risen higher than any of my other Desem doughs so far. So I shaped it and put it in the couche:


Boy did we have a full kitchen today. It was hard to fit in the bread baking schedule. My daughter made cream puffs and potato croissants (boyfriend coming over). I had to put my Desem loaves on the top of the stove to get some warmth and I put a wet cloth over the loaves. One of the loaves actually had the top crust(which was turned upside down) heat up, dry out and stick to the cloche, which never happened before. I had to spray it with water to get it off and then I noticed the outside layer, which was touching the stovetop through the couche, was actually a bit cooked! I decided to slice down through the middle to try to save the loaf. It actually came out pretty nice:

The lighter color on the top of the crust is where the dough dried and cooked.
The next loaf was also dried out on the top crust from the heat of sitting on top of the stove and stuck to the couche. I was able to peel off the couche and get the loaf onto the stone. I also made one long lengthwise slice on the top of the loaf to try to save the loaf. I don’t think any other slices would have worked as the whole top crust was dried out and somewhat cooked. I didn’t realize it was that hot on top of the stove when I set the loaves on a grate on top of the couche on the stovetop. But we had been using the stove for hours and it was just hotter than I realized. It also came out nice anyway:

Here are the two finished:

I don’t have any crumb pictures yet, but will tomorrow. They are still too hot to slice!
I am so glad I tried Desem bread. I never knew Whole Wheat bread could taste so good! It is moist, chewy, with a hard to describe full fermented wheat flavor of toasted wheat and maltiness. There is no added malt, but you sure taste it, especially when you toast the bread. My children that don’t usually like Whole Wheat bread (most of them) love the Desem bread. It never fails to be tasty and wonderfully sour!
Here are the pictures of the crumb:

Experimenting with Desem Starter
My last two batches of Desem were pretty different. The Desem starter is now very stable and reliable so I thought I might try experimenting with it a bit. Last week I made a batch of the more traditional Desem recipe which is in Laurel’s Bread Book. The dough is raising higher and the malt flavor of the wheat is very pronounced, not to mention how wonderfully sour it is EVERY time. I didn’t put any malt in the dough at all for the first batch but the fermenting of the Whole Wheat made the dough taste like malt, especially when toasted. I started with about 3.5 lbs of dough:

This doesn’t look like over 3 lbs of dough , but it was. I made this dough from the preferment of the starter from the night before. I then let it bulk ferment for four hours at which time I took the dough out of the bowl and shaped it and then put it into small bannetons:


While looking at this picture, I remembered the first time I tried Desem and my dough was a wet mess and I tried putting it into the bannetons and how terribly the dough stuck and ruined my bread! The dough was then placed in the warm oven ( I turned on the oven to 200 degrees long enough to warm up the baking stone and then turned the oven off and kept it cracked open) and covered with a wet tea towel to keep it humid:

I proofed it for two hours, taking the dough out of the oven after one hour so I could heat the oven and placing the dough on a rack on top of the warm oven with the dough still covered. Here is my result:

Next I decided to try to use my Desem starter to bake up some lighter bread made with 1/2 bread flour. I also decided to use a regular loaf pan for baking. I used 2 cups of Desem prefermented from the night before and followed pretty much the same schedule as the last Desem dough, four hours bulk ferment and two hours proofing. I missed with the two hours proofing though, although the dough felt ready, it really needed another 1/2 hour or more to proof. Here is the dough proofed and ready to shape:

I shaped the dough like a regular loaf where you fold over the ends and then fold over lengthwise, pinching the dough together with the heel of your hand. I then placed the dough into loaf pans:

The dough felt proofed enough, so I poked a couple of holes into the top as suggested in Laurel’s Bread Book. It is supposed to keep the top crust from separating from the rest of the loaf.

I wasn’t satisfied with it though, so I also slashed and then I baked the loafs at 450 degrees for five minutes, spraying several times, and turned the oven down to 400 degrees and baked another 40 minutes, turning halfway. Here are the loaves:

When the bread came out I waited for it to cool a little, and then I spread butter all over the loaves to help make the crust soft and chewy(this was supposed to be a softer Desem). As you can see, I needed to allow the dough to proof longer. I think with the added bread flour, I needed not only to let the dough raise longer but maybe at room temperature instead of in a very warm oven. I will have to try that next time. The crumb was pretty nice although a little dense:

If you want to experiment with Desem and don’t want to wait the two weeks for the starter to get going and then another month for it to gain strength, I have a limited amount of Desem for sale on my website. It will be sent as a small piece of dough ball at a very low hydration so it won’t raise while enroute. You can find out more about it at the bottom of the page at:
http://www.northwestsourdough.com/starter.html
Click on the picture of the Desem bread and it will take you to another page that tells more about the Desem starter and what you need. You will need Laurel’s Kitchen Bread Book and a good supply of fresh organic Whole Wheat flour plus some really good water and a cool place in your house. Desem is fascinating, especially for those who love Whole Wheat breads.
Desem…in a Pot
My hubby bought me a nice cast iron pot with a lid so I could try out the sourdough bread pot baking that is taking everyone by storm, even though it’s really as old as the campfire and camp cooking from long ago. You know…whats old is new again. So I gave it a go today with my new pot and ran into a little trouble. I mixed up the dough fine and bulk fermented and proofed the dough…and also preheated the pot and lid…but ran into trouble when the dough in the basket had to be overturned into the hot pot. The dough deflated somewhat when it had to make that fall from basket to pot bottom. So I am thinking of ways to avoid that drop. Here is a picture of the bread still in the pot:

Doesn’t it look like some bacon and a pot of Jocko Beans are coming right up? Anyway here is the bread:

When I turn it to the side you can see where the dough sagged as it deflated:

I haven’t sliced open the bread yet, but I know it is heavier than it could have been. It still seems like a pretty nice loaf though. I am hoping for the best! I was wondering if I could line the proofing basket with aluminum foil and then lift the whole thing out and place it in the hot pot instead of turning the basket over and having it plop down into the pot. If I made the dough a lower hydration, I could maybe support it with my hands and somehow get it down into the pot??? I don’t know??

1/2 and 1/2 Honey Sunflower Seed Bread
I am working with 1/2 & 1/2 dough, half whole wheat and half bread flour which will end up being a Whole Wheat Honey Sunflower seed loaf. Approximately 1/3 of the recipe is sourdough starter, then water, and everything else. I use my K-tec mixer to mix up the dough. I never mix for more than five minutes. After proofing for only four hours, the dough was doubled but too sticky, so I kneaded more flour into the dough with the salt and the sunflower seeds. The dough is now resting in “boule” form before I “twist” it up and place it in the proofing baskets.Here are the boules: