
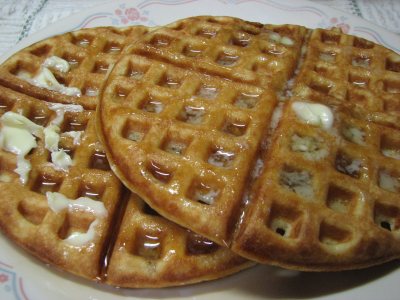
Killer Sourdough Sourcream Waffles
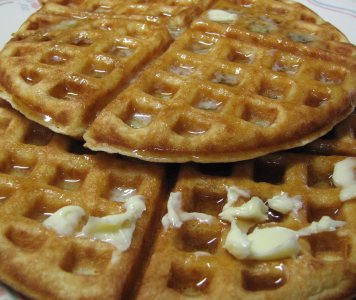
I was going to make up some sourdough waffles using the recipe available on my website http://www.northwestsourdough.com/recipes.html , but my son asked me to add more eggs to the batter. So I decided to not only add an extra egg, but to add some sourcream as well. When I baked (waffled, griddled?) up the waffles, my son was really happy (how can you NOT make a 16 year old boy happy with waffles?) but my daughter said, “These are KILLER waffles, mom!” So I will pass on the changes to the recipe to you and see what you think.
First bowl – whisk together:
-
2 cups vigorous sourdough starter at 166% hydration
-
1.5 cups warm water (80-90 degrees)
Second bowl – add each following ingredient and then beat with whisk after each addition:
-
A stick of melted butter (4 oz) (real butter, no substitutes)
-
2 Tablespoons Malt Syrup (I did not level off the Tablespoon)
-
5 large eggs
-
1/2 cup of sour cream (no low fat or no fat stuff!)
Third bowl – Add following ingredients and mix thoroughly:
-
3 cups all purpose flour
-
2 teaspoons salt
-
1 teaspoon baking soda
-
1 Tablespoon baking powder
Now add the contents of bowl one and bowl two together and using your whisk, mix thoroughly. Then add the contents of bowl three to the bowl of wet ingredients and whisk all together until blended. Let the mixture set for ten minutes while your waffle iron is heating to a high heat. The batter is a bit thin, but if it is too thick the waffles will be heavy, not light and crispy with a fluffy, soft interior. I spray my waffle iron when it is heated, with pan spray, and then I use one ladle of batter for my waffle iron and cook on high until it is as brown as I like. These waffles are so good that the taste of smooth, rich butter continues as you swallow each bite. The outside is crisp, but not crunchy, the interior like I mentioned, is soft, rich, smooth and really awesome. Try some and see if you don’t think so as well! This recipe makes enough for my large family, I think it made 12 – 15 eight inch waffles. So cut down on the amounts if you want less, don’t be afraid to put in three eggs if you are halving the recipe. Enjoy!

Raisin Walnut Cranberry Sourdough Bread
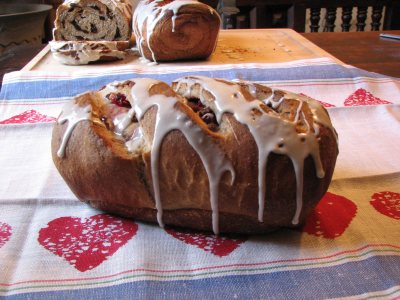
Aussie Bill came up with nice walnut raisin loaf. I converted the recipe with a few tweaks of my own. So here is Raisin Walnut Cranberry Sourdough :
-
2 cups starter at 166% hydration – 18 oz (starter fed with flour and water using the same volume measurement).
-
1 & 1/4 cup water – 10 oz
-
1 cup milk (scalded, cooled) – 8 oz
-
2 large eggs – 3.4 oz
-
3 Tablespoons oil – 1.5 oz
-
3 Tablespoons honey 2.1 oz
-
1 Tablespoon salt – .7 oz
-
2 cups Whole Wheat flour – 8.4 oz
-
4 cups Bread flour – 18 oz
-
4 cups All Purpose flour – 16.8 oz
-
1 -1/2 Tablespoons Cinnamon or Mixed Pumpkin Pie spice
I put all of these ingredients together in my mixer and mixed just until incorporated(adjust water/flour if too dry or wet). Then I let the dough rest for 15 minutes (autolyse). I then mixed the dough for one more minute and let it bulk ferment for seven hours, the dough was very sluggish because of the spice in it, which tends to slow down the yeast. I then put the dough into the refrigerator overnight.
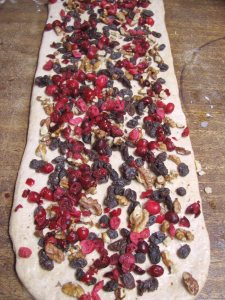
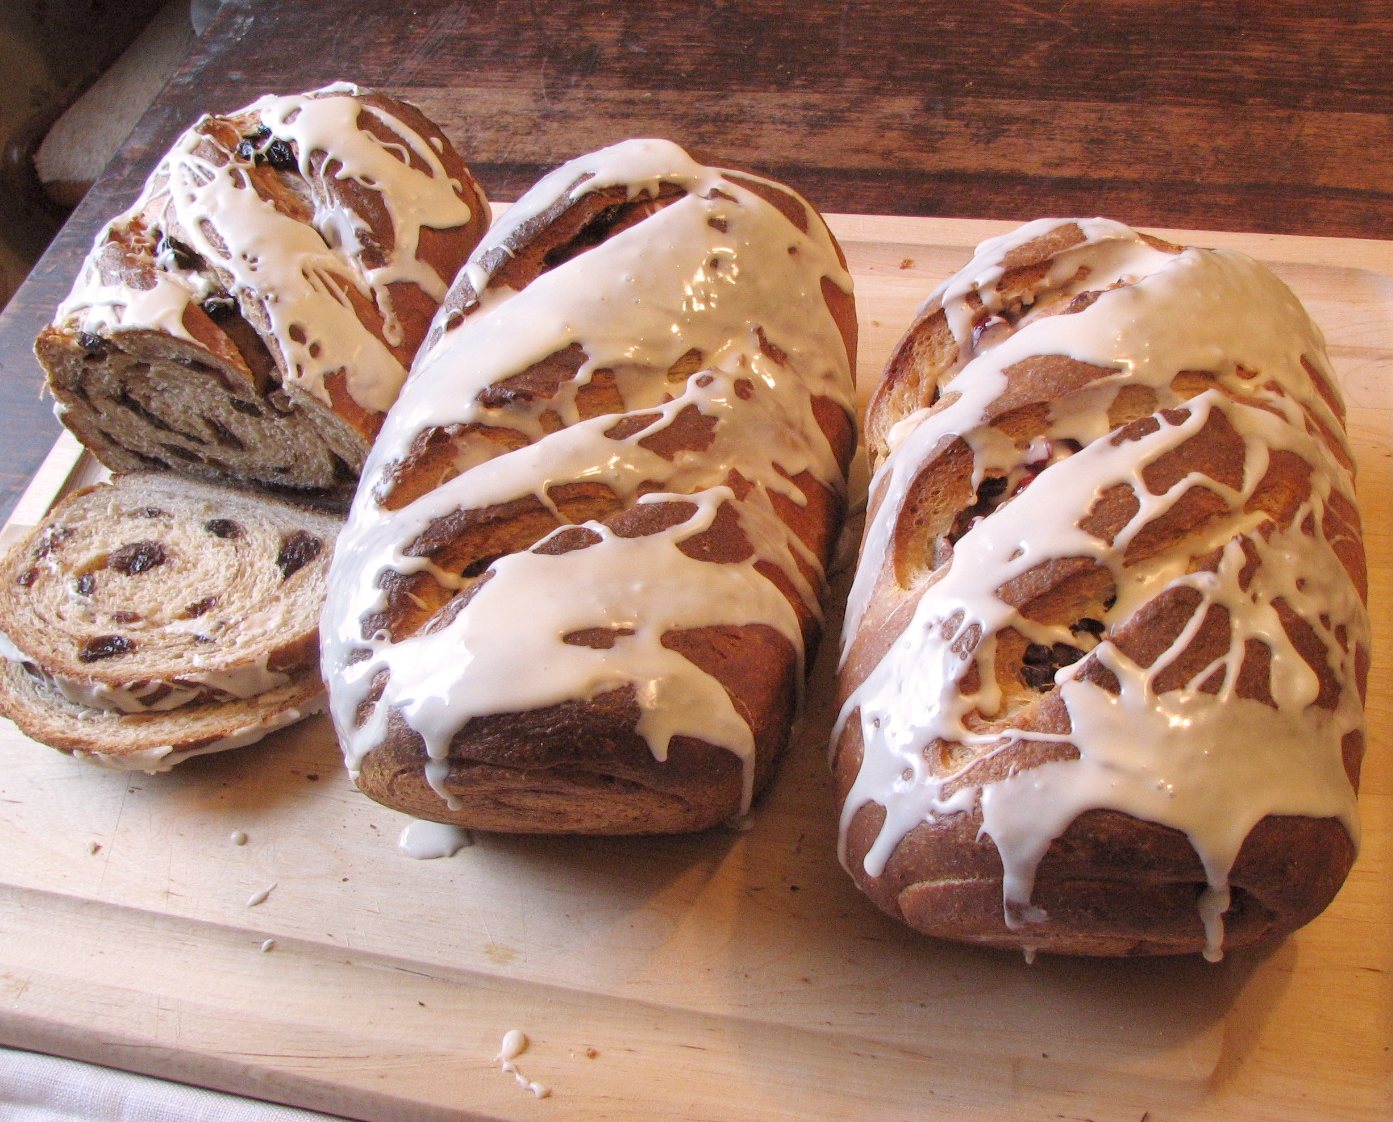
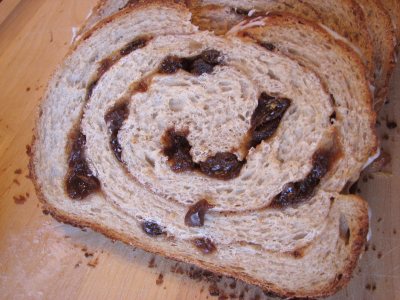
Next morning I took out the dough and let it warm up for four hours. I shaped the dough by dividing it into three pieces, and then rolling out each piece into a 20 x 8 inch rectangle. After I rolled out the dough , I spread evaporated milk over the surface and sprinkled a cinnamon sugar mixture over the whole surface ( I like the cinnamon mixture heavy on the cinnamon and light on the sugar). I then sprinkled walnuts and raisins on the first dough, I used only raisins on the second one,
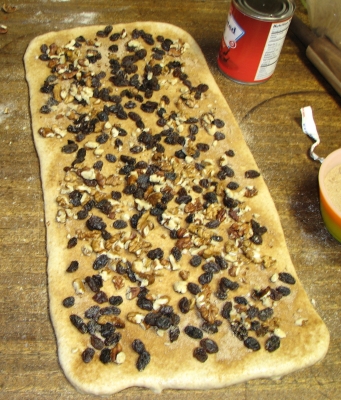
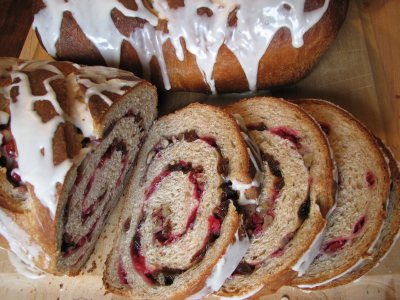
and on the third one I put raisins, walnuts and chopped, frozen cranberries.
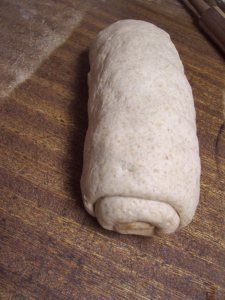
Then, roll up the dough…
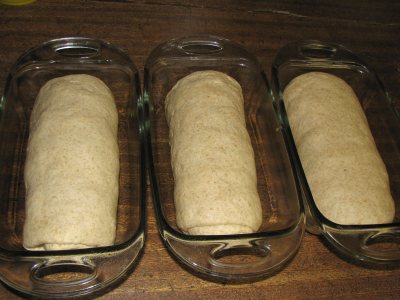
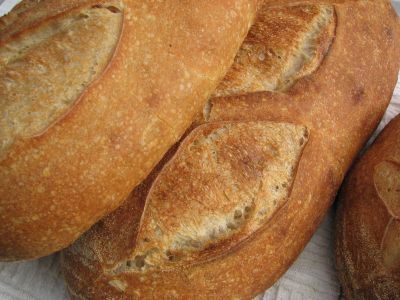
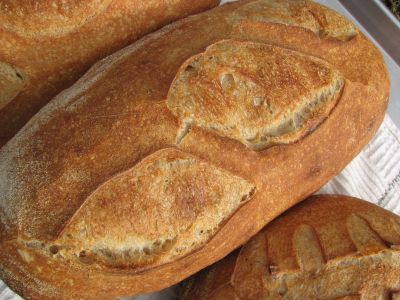
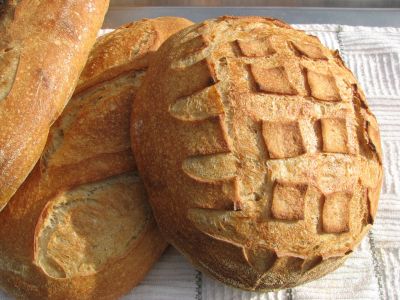
Here are the three loaves ready to proof. They took two hours to proof. When ready, bake at 375 degrees for about 40 – 45 minutes or until a toothpick inserted comes out clean(I baked all three together and did not use a baking stone). I had to put aluminum foil over them towards the end of the bake to keep them from getting too dark.
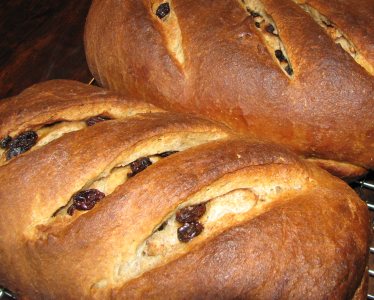
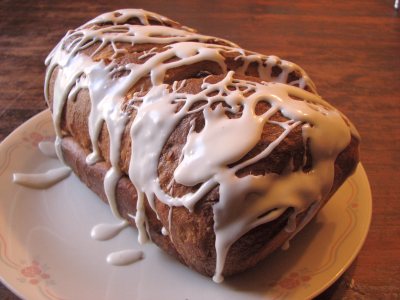
This recipe makes 5 lbs 7 oz of dough.Here are some pictures of the finished bread:
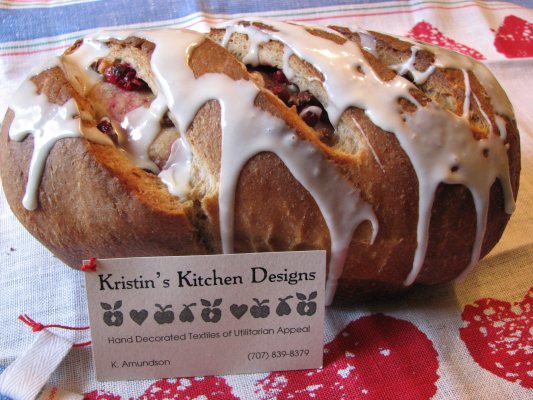
A lady named Kris was one of the winners on the recent forum contest. She very kindly sent me a beautiful Linen Proofing Cloth embellished with her own artwork. I am very pleased! Thankyou Kris! Here is a picture of my bread with her cloth and business card. If you are interested in buying some of these cloths for a gift, give her a call, her number is on the card below (707-839-8379) or email her at : still_kris2004″at”yahoo.com. A better picture of her cloth is at the beginning of this blog entry.
This bread is so delicious, my daughter described it as “Killer Good”. However, you haven’t tasted it until you toast a thick slice and slather it with real butter…..MMMMMMM! All three loaves were almost gone the first day. I hid a piece for myself to have with coffee this morning!
Sourdough Millet Loaf

I decided to use some Millet grain that I had bought for experimenting with. I ground up a cup of Millet into a meal type consistancy, which I used in the dough and outside of the crust when making this bread. The texture of the crumb was really great, I had wondered if a whole cup of ground Millet would affect the crumb and how, but it turned out nice and the smell was terrific. The crust was crunchy, crispy and making toast out of this bread was a treat. For the first two loaves I brushed the crust with egg glaze and sprinkled the ground Millet on the outside. For the third loaf, I also brushed on the egg glaze but I sprinkled whole Millet seed on the outside. Here are some pictures of the loaves:
Here are the loaves proofing in their couche:

Here are the first two loaves:

Here is a closeup of the crust with the ground Millet on it:


Here is the loaf with the whole Millet seed on the crust:


Here is the crumb:

Millet is an interesting addition to sourdough bread. The grain baked on the outside of the crust was not crunchy hard like cracked wheat, but was softer and more biteable, yet still crunchy.
From the site http://chetday.com/millet.html , I found the following information about Millet:
Millet is highly nutritious, non-glutinous and like buckwheat and quinoa, is not an acid forming food so is soothing and easy to digest. In fact, it is considered to be one of the least allergenic and most digestible grains available and it is a warming grain so will help to heat the body in cold or rainy seasons and climates.
Millet is tasty, with a mildly sweet, nut-like flavor and contains a myriad of beneficial nutrients. It is nearly 15% protein, contains high amounts of fiber, B-complex vitamins including niacin, thiamin, and riboflavin, the essential amino acid methionine, lecithin, and some vitamin E. It is particularly high in the minerals iron, magnesium, phosphorous, and potassium
MIllet seems to go really well with sourdough baking, so you might want to pick up some Millet next time you are in town, and try it out.
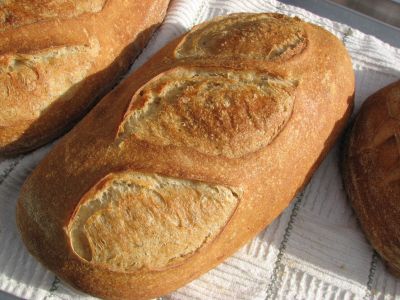
Sourdough Spelt

I have been doing some of my experiements with Spelt flour and decided to do up a Spelt Bread which was mainly from Spelt instead of just adding Spelt to other recipes. I made up a preferment in the evening and left it out at room temperature:
-
4 cups Whole Spelt Flour – 14 oz
-
2 cups Spring Whole Wheat flour – 8.4 oz
-
3 cups water- 24 oz
-
1 teaspoon Sea Salt – .3 oz (to control fermentation)
-
1 cup vigorous Desem or Whole Wheat starter at 100% hydration – 9 oz
I put this into a large covered container and next morning it was very bubbly. I then poured the premix into my mixer and added:
-
3 Tablespoon Oil – 1.5 oz
-
2.5 teaspoons Sea Salt – .7 oz
-
1 Tablespoon Non-Diastatic Malt syrup – .85 oz
-
4 cups of bread flour – 18 oz
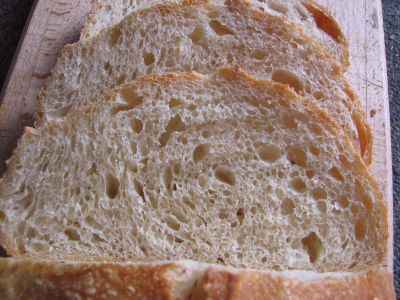
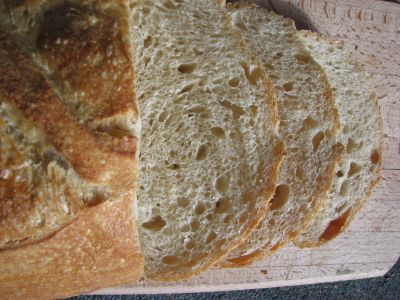
I mixed the dough for about 2 minutes, but had to take the dough out of the mixer and knead some by hand as the batch wasn’t as large as my usual batches and the dough was wandering around the bowl and not mixing as well as it should. I put the dough back into the mixing bowl and allowed the dough to autolyse for 20 minutes. I then mixed again for another minute. The dough, with the malt included as part of the liquid, was at 65% hydration. The dough felt nice, but I think I would make it at 67% hydration next time, adding a small amount more of water (about 1 oz or 1/8 cup water). I let the dough double, which it did in about 3.5 hours, and then I shaped the loaves. After proofing the loaves for about 2 hours, I baked them at 450 degrees in my usual way, by slashing the loaf, placing it on the hot oven stone,spraying the dough once, covering it with a preheated large roaster lid for 15 minutes. After the 15 minutes, I take off the lid and turn down the oven to 425 degrees and let the bread bake for 15 more minutes, turning once during that time to allow for even browning. The bread is quite delicious. It has a chewy crust and a soft, moist crumb. Here are some pictures:


The slashes on the long loaf reminded me that it was time to change the blade!
Here is a picture of the crumb, no nice outside picture, as by the time the bread cooled, the sun had fled:

This recipe made 4 lb 11 ounces of dough, just enough to make two large loaves and give a little piece of dough to smallest daughter to shape into her own loaf, which was cut into and eaten faster than the camera could be whipped out! Spelt has a wonderful mild flavor, which would come to mind if someone said “Old World Flavor”. It is also a soft flour and weighs only 3.5 ounces per cup right after grinding. The flour feels very soft and fluffy. When added to white flours, to bring up the ash content, it seems to make the bread crumb lighter and fluffier. Give it a try, it can be found in most health food and bulk food stores.
Bulk Ferment…again…using San Francisco Starter…
Before I get started with the starter experiment in bulk fermentation, I wanted to let you see a really terrific first Desem loaf by Jeremy Shapiro, an extraordinary baker and chef at : http://www.stirthepots.com/2008/02/desem-my-first.html . Spend some time perusing his website, it has much of interest to those who love sourdough and fine cooking.
In an earlier post, I worked with Austrian Starter and tried a seven hour bulk ferment in a controlled environment, the dough fell apart and was a loss. Then I tried it again and fermented the dough in the same manner for five hours and the bread was not only a success but had a nice mild sour (which was the purpose of this experiment anyway). Then the next logical experiment was to see if I could push the San Francisco Starter further because it is a longer proofing starter and could potentially take the longer bulk ferment with heat. So I made the same Basic White Recipe but substituted a cup of Spelt flour (which I also did with the other experiments) and 1/4 cup of milk powder for a more tender crumb. I then put the dough into a large container with a lid and popped it into my oven which had the baking stone in it to preserve the warmth, and was warmed by keeping the oven light on. I had a thermometer in the oven and kept the door propped open a couple of inches. The heat was just at 80 degrees the whole time. I would have liked to try it at 75 – 78 degrees, because I think that would be better, but I have no way of doing that at this time. Anyway, I had the dough in the warmed oven for seven hours and then took it out and left it at room temperature 70 degrees for another two hours. The dough felt wonderful, was light and full of air foamy bubbles. Here are the pictures of the this batch of bread:


The bread smells heavenly! The crust was crisp and shattery, and it was sour, but not enough sour! So guess what? I am going to repeat the experiment again and push the San Francisco Starter nine hours in a controlled warm environment. That is the real potential of the San Francisco Starter, its ability to last when other starters begin to break down. I am hoping for a consistantly sour bread with a dependable technique. I get breads sour all of the time, but often it is a hit and miss kind of thing. I would like some consistancy. Whole grain breads or breads with a higher ratio of whole grain flours are easy to get a great sour with, the white breads are more difficult to get it with consistancy. When I want a sour loaf, I want it sour! I think adding a little bit of Rye flour would also help that, but I want to push the timing thing first. If you have any suggestions, please offer them, otherwise…stay tuned…
Spelt…I Certainly Do Like It!

I have been a bit busy and have not posted lately, but that does not mean that I have not been baking sourdough! I did some experiments with bulk fermentation and heat which came out pretty interesting. I also have been working with Spelt flour and have found it to be a terrific addition to my pantry of flours. First off the bulk fermentation. I tried a batch of bulk ferment dough in a controlled 80 degree environment. I had used the Austrian sourdough starter so I had hoped I could push the ferment for at least seven hours….wrong….! I had some dough that was falling apart sticky and the gluten was broken down. It made some pretty flat bread…but it tasted great with a wonderful sour. So I made the same recipe again and kept it at 80 degrees for five hours and the dough turned out wonderful, was very nicely sour and had the rustic, wheaty, dusky flavor of Spelt. I don’t have pictures of the ruined bread because I only baked one loaf, the rest I turned into stretched bread (delightfully sour though, see earlier post below for stretched bread).
Here are some pictures of the bread with Spelt flour, this is just the Basic White Sourdough with some Spelt flour substituted:


This sourdough was mixed, fermented at 80 degrees F for five hours, shaped, refrigerated overnight and not baked until the afternoon of the following day, so it had a long cool proof also. I think it would do better below 80 degrees by a couple of degrees, like around 76 – 78 degrees. I didn’t have much of a way of lowering the temperature though as I had my stone in the oven to keep the warmth even and had the lightbulb on with the door cracked open to acheive the 80 degrees. I need a proofing box. By the way, I am finished moving my site to a new server, so if you see any broken links email me and let me know. Hopefully my site won’t have so much down time now! Tomorrow Feb 20 is the last day to submit your idea for naming my sourdough book. There are a couple of prizes offered, see what is going on at:
Northwest Sourdough Message Board
I am transferring my domain,
I am transferring my domain, so if you can’t see pictures, that is why! Hopefully it won’t take too long.Come back soon!
Happy Baking,Teresa
Can I have another….Sourdough Doughnut?

Today I am working with Sourdough Doughnuts! I love sourdough baking! There is so much creativity involved.
I started last night with a preferment so that my dough today would have a high ratio of active cultures.


This morning I took the preferment which was bubbling along nicely and poured it into my Blendtec Mixer . I then added milk, mashed potatoes, vanilla, pastry and AP flours and other ingredients to make up a dough at 62 % hydration. The amounts were just at the limit of what my mixer could handle. The dough was shaggy looking when I was done with initial mixing.

However, after an autolyse period, the dough was looking stretchy and smoother.

I took the dough out of the mixer and put it into an 8 quart container, as my mixer had little room for the dough to expand. I used the Alaska starter so I didn’t have to wait all day long for the bulk ferment, plus the preferment also helps the dough to proceed at a faster pace.


I let the dough raise for about 4 hours. Then I poured it out on the table and divided the dough into two pieces. Each piece weighed just a little over 4 lbs, I had made 8 lbs 1.4oz of dough!


I let the dough pieces rest a bit and then rolled them out to about 1/2 ” thick circles. I had a donut cutter that I had bought at an antique store. It didn’t work too well. The inner piece for cutting the doughnut holes didn’t cut all the way through so I had to pull, rip out each center which was partially cut. I made about 50 doughnuts and 50 doughtnut holes. I let the dough proof on the couche for about 1.5 hours and then started to fry.


It took me almost exactly an hour to fry up all of the doughnuts. I had a deep, thick bottomed pan and I filled it with about 3/4 gallon of cooking oil. It kept the heat evenly so that I didn’t have to worry about the heat spiking or falling. I fried four doughnuts at a time for 2.5 minutes at just a little hotter than doughnut temperature around 192 degrees F.


I took the doughnuts out and drained them on a rack and then cooled them a little and put them in a pan of glaze:

Here are some pictures of the finished sourdough doughnuts:

I also shook some doughnuts in powdered sugar:


Here are the doughnuts up close and in half:

I don’t think I have ever baked anything sourdough that got so many raves… “These are the best doughnuts I have ever tasted, MOM!”; “These are circles of joy!”; ” Hey, these are the absolute best ever!!!” ; “Can I have another… another…another……..”
You get the idea. Sourdough doughnuts go stale faster than yeasted doughnuts, but they have a deeper flavor, more satisfying, they are denser, but tastier, and feel like you are eating something really good, not just sugarcarbs. They still warm up nicely in the microwave and taste stunning with a hot cup of coffee in the morning.
Slow Dough, Stretch Bread and Morphing Sourdough!
I started out baking last weekend with Northwest Sourdough Starter. It didn’t behave as usual, it was extremely slow, although I had it out at room temperature and had been feeding it daily for some time. The difference was in how cold it has been. I know I am sluggish when I am colder. The house has been harder to keep warm. We have iced over ponds and puddles outside and have had all week. There is talk of snow here on the coast! Anyway, I made up a batch of Basic White Sourdough with milk partially substituted. It took a full nine hours to bulk ferment. I let it take it’s time as I was interested in what was happening. I finally shaped the dough into loaves and put them to bed in the refrigerator overnight. Next morning, the dough took a full three hours to proof. I baked up two two pound loaves and two one pound loaves. They came out great. Here are some pics:


Made some sandwiches too:


So on Tuesday, I made up a morph batch of Northwest and Desem starters. I have used the morphing technique before and have had some interesting bread result. This time was no different. The morphed batch also took a long time to proof, but not to bulk ferment. Bulk ferment was about five hours but then next day it took another five hours for the dough to be ready to bake! I think that was the longest warm up proof I have yet had (not counting retarded proofs). It didn’t seem to matter to the dough, as it just wouln’t seem to overproof. Earlier in the morning though , I had taken out a bowl of the dough from the same batch which I had reserved to griddle up some Sourdough Stretch Bread. Betcha have’t heard about that yet! (Well some of you have because I have made it before but I think I called in fry bread or something like that). I decided to call it stretch bread because it really isn’t fried but stretched out and griddled. I took about 3 oz of dough and gently streched it apart, so that some of it was thinner in spots and some thicker. Overall about 1/2 inches thick. I then threw the dough onto a 350 degree greased griddle and turned it a couple of times, trying not to burn it. I think I turned it at three minute intervals twice on each side for a total of 10 – 12 minutes. Then you take off the stretchers, split them in half, partly with a knife partly pulling it apart, butter it good and eat. The outside is crispy and the inside is soft and sour! Yumm! It is also good with jams, jellies, honey, or powdered sugar.
Stretch Bread:


You can take any bread dough and do this, it is a terrific treat with hot coffee in the morning.
Later I baked up my morph bread, it was about 1/3 whole wheat flour, including the Desem and extra whole wheat added during the mixing.
Here it is:


This bread was very delicious with a very nice sour tang. You can see the crumb was light and open and no signs of overproofing even after five hours! This was a fun and interesting week for my baking with my sourdough starters.
Old Time Sourdough Flapjacks

Here are some Old Fashioned Flapjacks like you might have found in the “Olden Days”.
These Flapjacks are tender, moist, slightly dense and very buttery, they were gobbled up fast by my family.
-
In a large bowl beat up four large eggs
-
Add 1/2 cup melted, cooled butter,
-
1 cup canned cow (evaporated milk)
-
1/2 cup water
-
2 cups vigorous sourdough starter (kept at 166% hydration which just means 1:1 ratio of water to flour by volume)
-
1 Tablespoon of Malt syrup (or Honey)
In a smaller bowl mix together:
-
3 cups of All Purpose Flour (or substitute 1 cup of Whole Wheat flour for one of the AP flour if using Honey instead of Malt syrup)
-
3 teaspoons Baking Powder
-
1 teaspoon baking soda
-
1 teaspoon salt
Now add the dry ingredients to the wet ingredients and whip together gently. Let sit for about 10 – 15 minutes to allow the flour to absorb the liquids and get your griddle good and hot, about 400 degrees. Lightly grease griddle. Griddle your flapjacks until one side is bubbly and the edges are slightly dry, then flip once and griddle on the other side. Serve with lots of fresh butter and Maple syrup (we add Malt syrup to our Maple syrup for extra flavor). Get ready to asked for more!
