
San Francisco Starter Experiments
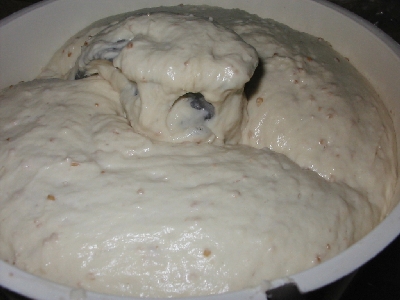
Today I baked up a lower hydration dough using the San Francisco starter. I made a preferment from a motherdough of 80% hydration and let it set for 18 hours.

Then I added more flour and water to the batch and fermented it 6 more hours. After that I added the salt and rest of the flour and water and mixed it to a somewhat stiff (for me) dough.

I let this set for two hours to raise and then put it into the refrigerator overnight. In the morning I let the dough warm up for two hours, shaped, proofed and baked.


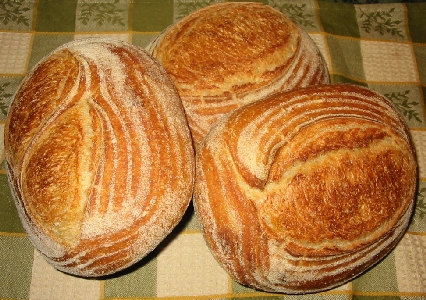
Here is the first loaf:

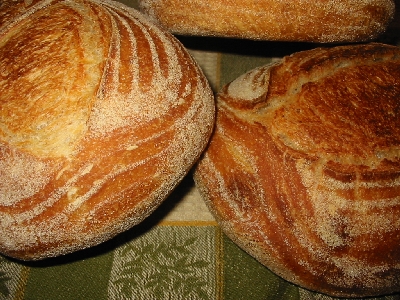
Here is the second loaf:


I used the roasting lid again to obtain a superior crust. It worked great! You could hear the crackle of the crust as it cooled. The batch is a great success with a terrific flavor and crisp crust. I served it with fresh butter and Turkey soup.
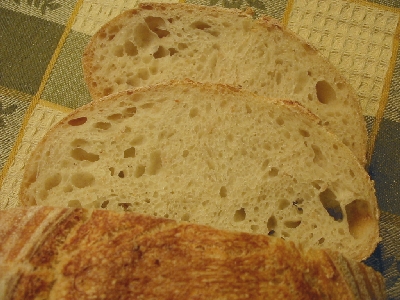
Here is a picture of the crumb which I took the next day. It is a lower hydration dough, so not too holey:

How About Lid Baking?… My Best SF Loaf Ever!
Well, here it is…. my best San Francisco Sourdough Bread ever!

But I am getting ahead of my story!
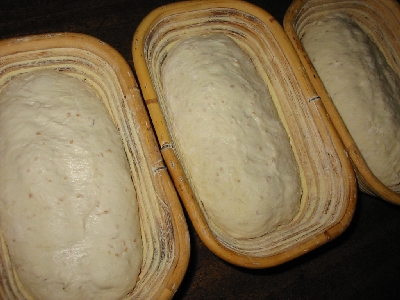
It started like this… I took out my San Francisco Starter from the refrigerator and warmed it up and fed it for several days. My last blog was on trying a SF technique from the manager of the Boudin Bakery of San Francisco. I felt that the starter I prefermented was too warm for too long and so I decided to do a shorter preferment at 72 degrees. I kept my eye on it and when it was super bubbly and doubled, I went ahead and mixed up the dough. I then let the dough ferment for another four hours at which time I shaped the loaves and put them into the refrigerator overnight:


Next morning I took out the dough and let proof for two hours:

I had shaped one batard style loaf and two boules, they were two lbs 2 oz each.
After two hours proofing and one hour preheating my oven, I baked the first loaf:


It came out pretty nice with a great crust and the crumb is nice too. Then I baked the second loaf which was a boule:

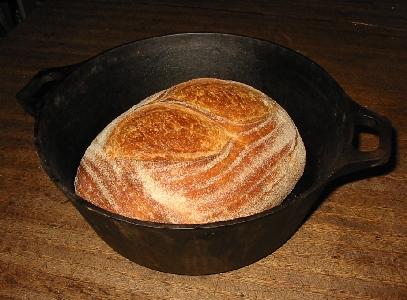
It came out okay, but I wanted a better color to the crust and bloom to the slashes. So I decided to take out my large roasting lid used for the Turkey pan and preheat it and use it to cover the last loaf:

What was neat is that the bread was still slid onto the stone first, sprayed once, and then covered by the lid. I had heated up the oven to 500 degrees. As soon as I had placed the lid and shut the door, I turned down the oven to 425 degrees and left the lid on for 15 minutes. After the fifteen minutes were up, I took off the lid and turned the loaf around. It already looked awesome! Here it is all finished:


Well, anyway, as you can see, the color is terrific! The crust is also wonderfully chewy, and crispy. There are some drawbacks for me to baking in a pot, although I do like it. I must say, there are no drawbacks to the lid method, at least I haven’t found any yet! Having the loaf sit right on the stone and have the close steam generated by the lid covering it, has given me one terrific San Francisco Sourdough Loaf!
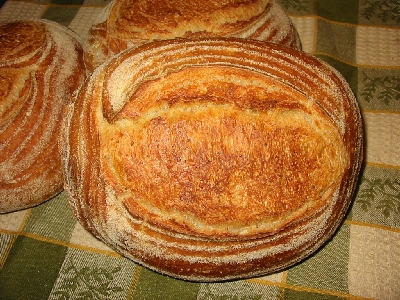
Here is the crumb:

I will write up the technique and recipe and put it into the Special Recipe folder. Have a great day baking sourdough, I know I did!
A Tale of Two Sourdough Batches
I started with some sourdough starter which I kept at 72 degrees for 24 hours. I was following a technique I found on this site by Fernando Padilla, Plant Manager of Boudin Bakery in San Francisco, Ca. http://www.exploratorium.edu/cooking/bread/recipe-berkeley.html
I was trying to obtain some results the same as Boudin Bakery, which as everyone knows is the most famous Sourdough Bakery probably in the world. Anyway, I then used the starter the next day and mixed up a batch of dough using the recipe provided. Except that I often like to hold out on using the salt until after the Autolyse or rest period for the dough. So I made up the dough and did Autolyse. The dough was looking great. It had that just perfect feel to it. I then added the salt and stirred down the dough with the mixer. Shock! Disbelief! Before my very eyes, the dough fell apart and turned into a gooey mess! I did not mix for more than four minutes, so I knew I hadn’t overmixed. I had made a batch earlier in the week that did the same thing right after I added the salt which was Morton Iodized Salt by the way. Now I don’t know if it was the salt or the prefermented stage of warming the starter or what actually caused this gooey mess. The earlier batch I had made was so bad it had to be thrown out. I decided to save the present ruined batch until tomorrow and see if I could do anything with it, so I refrigerated it. Next, I decided to try again, but instead of using a starter which was kept warm for 24 hours, I used my motherdough which I always feed and keep in the refrigerator at 80% hydration. I mixed up the batch using the exact same recipe, only using the motherdough and a different salt this time. I had some sea salt which is what I used. After autolyse, I added the salt and the dough was wonderful.The only problem was that I now had two large bowls of dough at around 6 lbs each as I had quadrupled the recipe. Tweleve pounds altogether, approximately.

I left them out in the cold pantry which was around 40 degrees (yes, we have snow and ice laying out in the yard in Coastal Washington ! ) overnight. Next morning I brought the first ruined batch in to let it warm up. It was all full of bubbles and looked very active. Once it warmed up I poured it out and folded it a couple of times to see if I could build some strength in the gluten. It ended up feeling like a Ciabatta dough around 75 – 80 percent hydration.

I kept it well covered in flour and decided to shape some Ciabatta loaves with it. What could I lose? My other alternative was to throw it away anyway! So I shaped it like Ciabatta and got four nice sized loaves weighing approximately 1.5 lbs each:

I was very unsure what would happen to this dough, as it may have acted like an 75% hydration dough, but it had a lot more flour in it than a dough at 75& would have.
I proofed the loaves for 2 hours and baked them and here is what I got:

The interior was not at all holey:

Here are the rest:

Believe it or not the bread was scrumptious! I got raves on it. I served it buttered with broiled Ling Cod and mixed veggies.
Now onto the next batch which I had taken out of the cold room an hour after the other bowl of ruined dough and was working with alongside with. Here is how nice the dough in the second batch looked:

It was soft, bubbly and terrific dough to handle. I divided into three pieces and shaped the loaves which I placed in a couche:


I let this dough proof while the first dough was baking. When the other dough was done and it was ready I baked them one by one. Here are all three loaves finished:

I was trying to obtain a bread similar to the Boudin Bakery bread. I was asked if my starters could make bread like theirs. I went to their site and looked up “Boudin” and that is how I found the recipe and technique. I also signed up to be a customer as I thought it would be great to have some sent in the mail to see what it really tasted and looked like. No go for me. At around 30.00 for two loaves, once they figured in shipping, it was too steep a price for me! I will have to visit them someday when I head on down the Coast and pick up a loaf or two! So I still don’t know if I even approached near to their quality, but I aspire to do so, as I am sure many sourdough bakers do. Here is a closeup of the crust on one of my loaves:

Here is a picture of the crumb:

I was surprised at how similar this recipe turned out to be to my own Basic White recipe. It made me feel like I am on the right track. Anyway, the second batch of bread turned out very delicious, with a chewy, crisp, crust and soft, holey crumb. Any bread made with the motherdough smells super, out of this world wonderful.
So this is the tale of two batches of dough, mixed up on the same day, following the same recipe and two VERY different results. This is a good lesson on, “If you follow a recipe and don’t get the same results as the author, don’t always blame the recipe,”(or the author as a matter of fact). Have a great day trying to bake the best sourdough ever!
Experimenting with Desem Starter
My last two batches of Desem were pretty different. The Desem starter is now very stable and reliable so I thought I might try experimenting with it a bit. Last week I made a batch of the more traditional Desem recipe which is in Laurel’s Bread Book. The dough is raising higher and the malt flavor of the wheat is very pronounced, not to mention how wonderfully sour it is EVERY time. I didn’t put any malt in the dough at all for the first batch but the fermenting of the Whole Wheat made the dough taste like malt, especially when toasted. I started with about 3.5 lbs of dough:

This doesn’t look like over 3 lbs of dough , but it was. I made this dough from the preferment of the starter from the night before. I then let it bulk ferment for four hours at which time I took the dough out of the bowl and shaped it and then put it into small bannetons:


While looking at this picture, I remembered the first time I tried Desem and my dough was a wet mess and I tried putting it into the bannetons and how terribly the dough stuck and ruined my bread! The dough was then placed in the warm oven ( I turned on the oven to 200 degrees long enough to warm up the baking stone and then turned the oven off and kept it cracked open) and covered with a wet tea towel to keep it humid:

I proofed it for two hours, taking the dough out of the oven after one hour so I could heat the oven and placing the dough on a rack on top of the warm oven with the dough still covered. Here is my result:

Next I decided to try to use my Desem starter to bake up some lighter bread made with 1/2 bread flour. I also decided to use a regular loaf pan for baking. I used 2 cups of Desem prefermented from the night before and followed pretty much the same schedule as the last Desem dough, four hours bulk ferment and two hours proofing. I missed with the two hours proofing though, although the dough felt ready, it really needed another 1/2 hour or more to proof. Here is the dough proofed and ready to shape:

I shaped the dough like a regular loaf where you fold over the ends and then fold over lengthwise, pinching the dough together with the heel of your hand. I then placed the dough into loaf pans:

The dough felt proofed enough, so I poked a couple of holes into the top as suggested in Laurel’s Bread Book. It is supposed to keep the top crust from separating from the rest of the loaf.

I wasn’t satisfied with it though, so I also slashed and then I baked the loafs at 450 degrees for five minutes, spraying several times, and turned the oven down to 400 degrees and baked another 40 minutes, turning halfway. Here are the loaves:

When the bread came out I waited for it to cool a little, and then I spread butter all over the loaves to help make the crust soft and chewy(this was supposed to be a softer Desem). As you can see, I needed to allow the dough to proof longer. I think with the added bread flour, I needed not only to let the dough raise longer but maybe at room temperature instead of in a very warm oven. I will have to try that next time. The crumb was pretty nice although a little dense:

If you want to experiment with Desem and don’t want to wait the two weeks for the starter to get going and then another month for it to gain strength, I have a limited amount of Desem for sale on my website. It will be sent as a small piece of dough ball at a very low hydration so it won’t raise while enroute. You can find out more about it at the bottom of the page at:
http://www.northwestsourdough.com/starter.html
Click on the picture of the Desem bread and it will take you to another page that tells more about the Desem starter and what you need. You will need Laurel’s Kitchen Bread Book and a good supply of fresh organic Whole Wheat flour plus some really good water and a cool place in your house. Desem is fascinating, especially for those who love Whole Wheat breads.
Two Night Super Sourdough
I whipped up a batch of Two Night Super Sour Bread using Northwest Sourdough starter. I did a preferment the first night . This is how it looked next morning:

I then built the dough in stages the next day adding more to the dough and letting it ferment until I was finished at the end of the day (You will be folding and strengthening the dough with each addition). I then poured out the dough and gathered it into a ball:

I divided it into three:

I shaped the dough into boules and placed them in colander baskets which were lined with proofing cloths and a rush basket:

Into the refrigerator they went for their second night. Then next morning I decided to do something a little different. I heated the oven very hot to 500 degrees and put two of the proofed dough balls onto the baking stone. One I covered with my cast iron pot, which was also preheated in the oven:

I baked the two loaves at 500 degrees for five minutes and then turned the oven down to 425 degrees. I also sprayed the uncovered loaf several times during the first five minutes. After 15 minutes, I uncovered the first loaf, taking off the pot.This is how the loaves looked with another fifteen minutes left to bake:

Here are the first two loaves done:


Here is loaf number three, I baked this loaf under a pot too:

Here are all three loaves:

Here is a pic of the crumb:

The bread is delicious and tangy, but not as tangy as usual for this recipe. I am wondering if a proofing box during bulk fermentation would help get a more consistant sour in the sourdough. I have had this same recipe turn out very sour, but it is colder in my pantry where I put the preferment and also cooler in my house than during the earlier months. I have noticed when we are doing alot of baking and the kitchen is very warm, that my loaves turn out more sour. I also feel that if it is too warm during the second proofing, you cannot have it proof as long as you would like. So I am wondering if a warmer bulk fermentation, and a cooler second proofing, would give a more consistant sour. Any ideas?
Oat & Honey Soft Sourdough
I have a new recipe called Oat & Honey Soft Sourdough. It is a one day sourdough that is mixed, proofed and baked in one day. I baked it up in bread pans and freeform Artisan style both and it came out great each way.
I used a vigorous starter and bulk fermented for four hours:

After four hours bulk fermentation, I shaped the loaves, putting two into bread pans and two into banneton baskets:

I then proofed two more hours :


The dough was ready to bake. I baked the bread in a 400 degree oven for 30 minutes turning halfway:

Here is a closeup of the crumb:

Here are the free form loaves proofed in the banneton baskets:


Here are all of the loaves together:

I haven’t sliced a freeform loaf yet to see the crumb, I will post later when I do. The bread came out wonderful, soft, terrific flavor. The first loaf was sliced and eaten before I could take too many pics of the four loaves together, with my teenagers gobbling as fast as they could. According to them this Oat and Honey Sourdough is “Awesome”.
I will be posting this recipe in the Special Recipes folder for those of you who subscribe to it.
I was able to get some pictures out in the sun! Which is rare here on the Washington coast!


A Nice Sour Bread
I made up a batch of Sourdough Bread using a new recipe. I also combined a cup of very sour motherdough with the regular Northwest starter, just for flavor because it was alcoholic. The dough bulk fermented well in six hours and looked like this:

I divided the dough into three pieces and shaped them. Each piece was about 2 lbs 2 oz.

I put the dough to rest in the banneton baskets and refrigerated the dough overnight:

Next morning the dough proofed for two hours and then I slashed the first loaf and popped it into the hot 450 degree oven :

Here is how it came out:

Here are the other loaves:


Here are all three together:

The bread came out very nice and tangy with a nice crumb:


This turned out to be a very nice sourdough and we ate it with ham and cheese for sandwiches. It has been a nice tangy loaf, but not as sour as the Desem bread I was supposed to bake on the same day and didn’t get to until today….gee it knocked my socks off! I did every possible thing wrong with this Desem dough and it still came out pretty good although not as much spring as it should have had. Here it is:

This dough was supposed to be ready to bake after the other dough was done. I didn’t get it mixed up though, although I had the preferment waiting to go. So I ended up mixing it up later in the day and hoped to get it into the oven…but no…we had to go out…so I just put it into the refrigerator. I took it out this morning and it wasn’t acting too vigorous, so I proofed it for 2 hours and then baked it. Gee it is SOUR!
Rustic Sourdough Biscuits…Yummy!
Sourdough biscuits….Yum! I whipped up a batch of sourdough biscuits this morning that really came out great. Instead of just white flour, I added a small amount of cornmeal and whole wheat to give the biscuits a more rustic flavor. Here they are:


Rustic Sourdough Biscuits
In a medium bowl mix:
2 cups vigorous Sourdough Starter
1.5 cups Milk
1/2 cup oil or melted Butter
1 Tablespoon Malt Syrup/or substitute 1 Tablespoon Brown Sugar
In a medium large bowl mix the dry ingredients:
4 cups all purpose flour
1/4 cup Whole Wheat flour
2 Tablespoons of Cornmeal
2 teaspoons Salt
1 teaspoon Baking Soda
4 teaspoons Baking Powder
Stir dry ingredients together and then add the first bowl of wet ingredients to the second bowl of dry ingredients, stir gently with a fork until a soft sticky dough is formed. Add more all purpose flour if the dough is too sticky. I had to add about another 1/3 of a cup of flour. Pour out on a well floured surface and knead just enough to have the dough gather into a ball and be smooth and pliable. This dough will still be somewhat sticky on the inside, just keep the outside covered with flour as you roll it out and cut biscuits with a biscuit cutter. If the dough is kneaded too much or you add so much flour while kneading that it is no longer sticky inside, it will be a tougher biscuit. So handle the dough gently and quickly and get the cut biscuits onto a baking sheet lightly greased or sprayed with pan spray. Pop the biscuits into a preheated oven at 400 degrees for 12 – 15 minutes. Eat while hot with dripping butter/honey/jam etc. Enjoy!
Experiments with Sourdough Pot Baking
After my Christmas loaves, I made up a batch of Basic White Sourdough and added a 1/4 cup of cracked wheat which had been soaked in hot water instead of the cornmeal. Without the cornmeal, the dough bulk fermented much quicker and I shaped the loaves and put them into small banneton baskets again. This time I made three loaves and they were a bit over 1.5 lbs each.
Here are the loaves in their baskets:
Here is one of the loaves when it was ready to pop into the oven:

This dough didn’t take as long to proof as the dough with the added cornmeal. It wasn’t as sour as a result, but a very good loaf in it’s own right. I used a flexible plastic cutting board as a peel to get the dough into the preheated cast iron pot. I then put on the lid without spraying any water as a result of the prior experiment showing that the initial drying of the skin of the loaf created a better outcome with the slashes. It was also true with the pot baked loaves. They came out better without the early spray of water which I was giving the dough just before putting on the lid. Here is one of the loaves still in the pot:
All of the loaves came out great with very nice crusts:


All three together:
Here is the crumb:
It seems that if you spray the dough immediately with pot baking or with stone baking, you don’t have as nice of a blooming of the slashes. It was very interesting finding this out and another one of those instances that make sourdough baking so much fun!
Christmas Gift Sourdough Bread
I made up a batch of Sourdough Bread to give for Christmas presents, except for one which I sliced open. I found out a new trick this time while baking. I stumbled across it quite accidentally, although I do remember thinking about the possibility before. I’ll start at the beginning. First I mixed up a batch of dough using the Basic White Recipe and added some cornmeal to slow down the fermentation so I could do a second proofing longer. Here are the four loaves of bread shaped and put into small bannetons. The loaves are approximately 1.5 lbs each:

The baking stone was very well heated as we were baking in the kitchen all morning and I put the stone in before we started. The dough actually took five hours to proof after being taken out of the overnight refrigeration. I popped one loaf into the oven first and did not spray or pour water into the bowl in the bottom of the oven. I loaded the next loaf and then I sprayed the oven and poured hot water into the bowl of rocks on the bottom of the oven. Halfway through the baking I noticed that the loaf which had gone into the oven first had a beautiful oven bloom and the other loaf was “Ho Hum”. Here are the first two loaves, the first loaf that was loaded is on the right hand side:

I wondered if the extra minute in the hot oven, had set the outside crust enough to allow the interior to bloom better than the second loaf which was sprayed almost immediately. I knew that in the bakery the dough is left out long enough for the skin of the dough to feel dry to the touch and in that way the “grigne” or slash bloomed in the correct way. Maybe leaving the dough in the oven a minute before misting or adding any moisture was a new trick. So for the next two loaves loaded at the same time, I loaded and then waited one minute before misting. That meant the third loaf was in the oven about two minutes and the fourth loaf was exposed to the heat of the oven for one minute. I then misted and poured some hot water into a bowl filled with river rocks which immediately humidified the oven. I misted at intervals for the first five minutes as usual and then baked the rest of the bread as usual. Here are the second two loaves:

As you can see the “grigne” or grin is very well pronounced in these two loaves. Here is another picture, the second two loaves are on the right hand side:

Here are all four loaves with the first two loaves at the top and the second two at the bottom:

The loaf at the very top was the only one misted immediately upon loading in the oven.
Anyway I am very pleased with the outcome of the loaves and you can bet I will repeat this experiment. If you want a more pronounced “grigne” or slashes, try letting the dough set in the oven for one minute before misting and see if helps your bread look terrific. Here are the loaves altogether in a gift basket:

Of course I couldn’t give away all of the loaves without slicing one open to see the crumb, here it is:

Merry Christmas everyone!